
How to create a payment reconciliation batch within Vertafore AIM accounting module using the InsCipher Connect® SRT feature and integration.
Table of Contents
- User Problem and Solution Description
- Prerequisites
- Getting Setup
- How to Create A Payment Batch
- Response and Validation Messages
- Change History Log
User Problem
For agencies that utilize Vertafore AIM® as their policy management system, users know that one of the time-consuming workflows occurs when creating payment reconciliation batches within Vertafore AIM®. Creating payments within AIM® requires users to manually select transactions (invoices) one at a time. As a result, this process can take agencies hours to accomplish, especially in states with high volumes. In addition, there is the potential for human error to be introduced, which could result in additional time being spent in reconciliation and the potential for missed or late payments.
What is the Solution?
InsCipher has developed a tool that has all of the various state reporting and payment rules built into its engine. These rules are regularly reviewed and maintained by our expert compliance team. InsCipher has developed a way for transactions that are submitted into its InsCipher Connect® platform to automatically be grouped together into relevant chunks based on state reporting and payment requirements. These groups of filings are then displayed within Connect® as a task and also assigned to a filer or accountant to complete with a specific state due date. When an SL Tax or Stamping Fee payment to state is ready to be made, a user can click a button within Connect® to automatically create a payment reconciliation batch in AIM® in an unposted status. This feature drastically streamlines the payment reconciliation process.
Prerequisites
Agencies interested in utilizing this functionality must first be contracted with InsCipher and have the AIM® integration tool set up on their AIM® SQL Server. For more information about how to get set up with the AIM® integration, review this article.
Database Permissions
Before you may utilize this feature, you will want to ensure that InsCipher is permissioned to perform the following procedures on the AIM® AFD database.
- GetKeyField - function
- spacGetBankAccount - function
- Batchttl - write permission to the table
- spacChkGetPayeeDetail - function
- spacPostActivity - function
- tacCheck - write permission to the table
- AP - read from the table permission
- spacChkCreatePendingPay - function
- spacChkSumCheckAmount - function
NOTE: InsCipher doesn't need permission to the individual tables within every section of the AFD database, but rather the permission to execute the procedures in general.
Getting Setup
Configuring the payment batch feature in Connect® is quite easy if you have already done the pre-requisites above:
STEP 1: Ensure that the AIM® integration tool is installed and connected to your SQL database.
STEP 2: If you have already installed the integration tool, enabling this feature is simple:
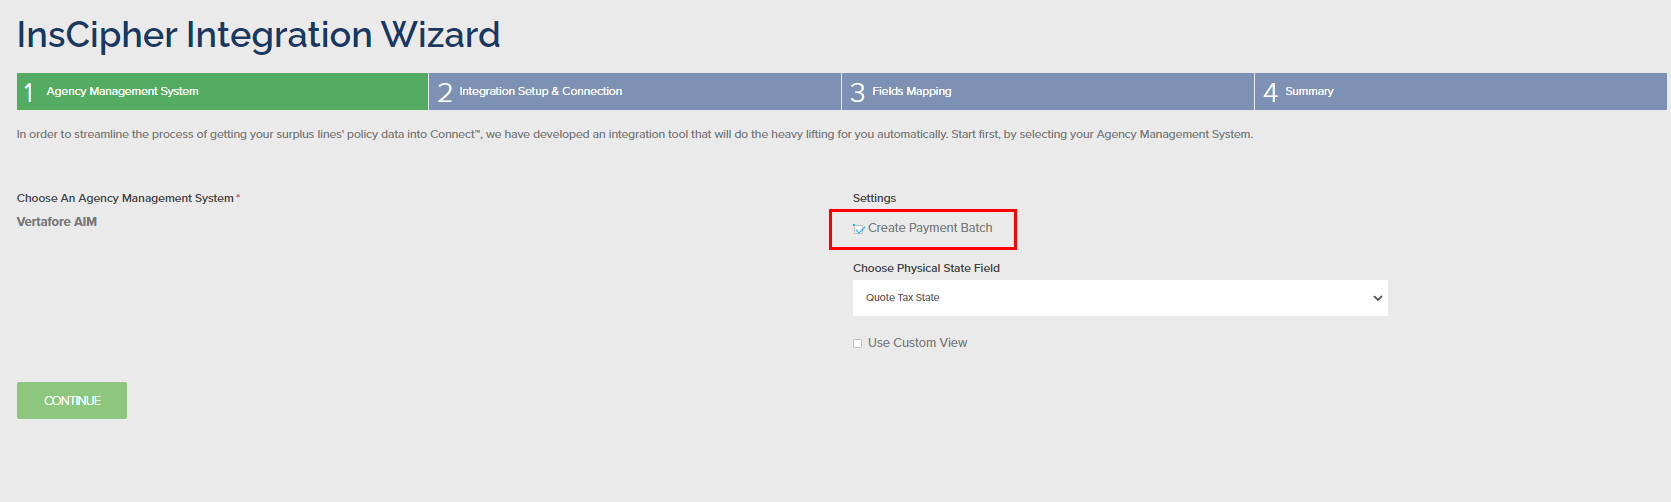
Go to Setup > Integrations > Details > Step 1 "Agency Management System" > and enable the "Create Payment Batch" setting > Click 'Continue' to ensure this setting is saved, then exit this section.
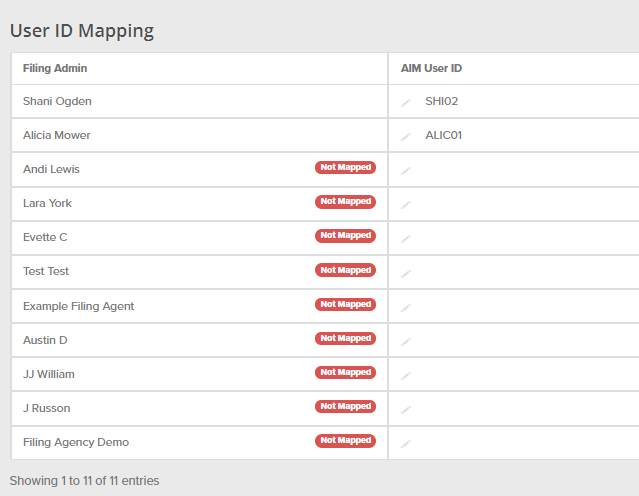
STEP 3: Lastly, on the "Field Mapping" page, ensure that the User ID Mapping is set for each user. This will be the user that will be associated when the payment batch is created within AIM.
STEP 4: You will need to provide to your implementation manager a report that has four columns of information. With this information, your implementation manager will setup your PayeeID mapping for you in the InsCipher backend settings. A customer-facing mapping table will be available during a later iteration of this feature.
1) State
2) TaxCode ID
3) Payee ID
4) Payee Code
IMPORTANT: Having this mapping is critical to the setup of this feature. Without it, it will not work. Please contact your Implementation Manager or support should you have additional questions.
How to Create A Payment Batch
Once set up, you are now ready to create a payment batch. This is done within the State Reporting Task Module within Connect®.
Step 1: In the State Reporting Task module, search for a payment task that needs to be completed and go into the details page.
Step 2: Review the task to ensure that all the correct transactions are associated with the task in the "Related Filings" section. You can either view these filings by clicking on the link or you can download a CSV file to review.
Step 3: After you have verified the correct filings are associated with the task and are now ready to make the payment, add the “Payment Approved” date. This action will then cause a button to appear that will allow you to create a payment batch in your AIM® accounting database. You can then click the button "CREATE PAYMENT BATCH IN AIM".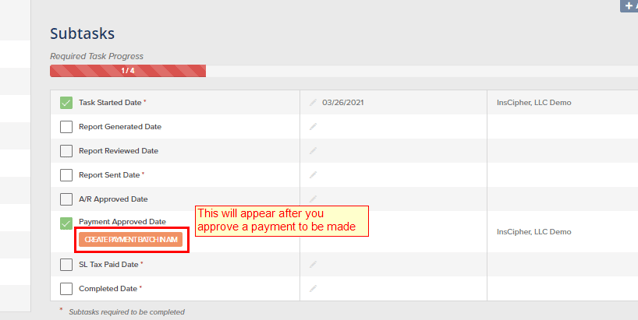
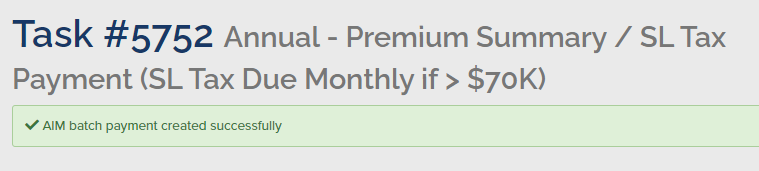
STEP 4: Once you click this button, you will need to confirm the action by clicking "YES". Afterward, a payment batch will be generated within your AIM® accounting database:
Response and Validation Messages
If there are any errors, these will display. Otherwise, you will see a success message:
You will also see the status of the action at the bottom of the Task Details informational section:
Error or Failed Messages
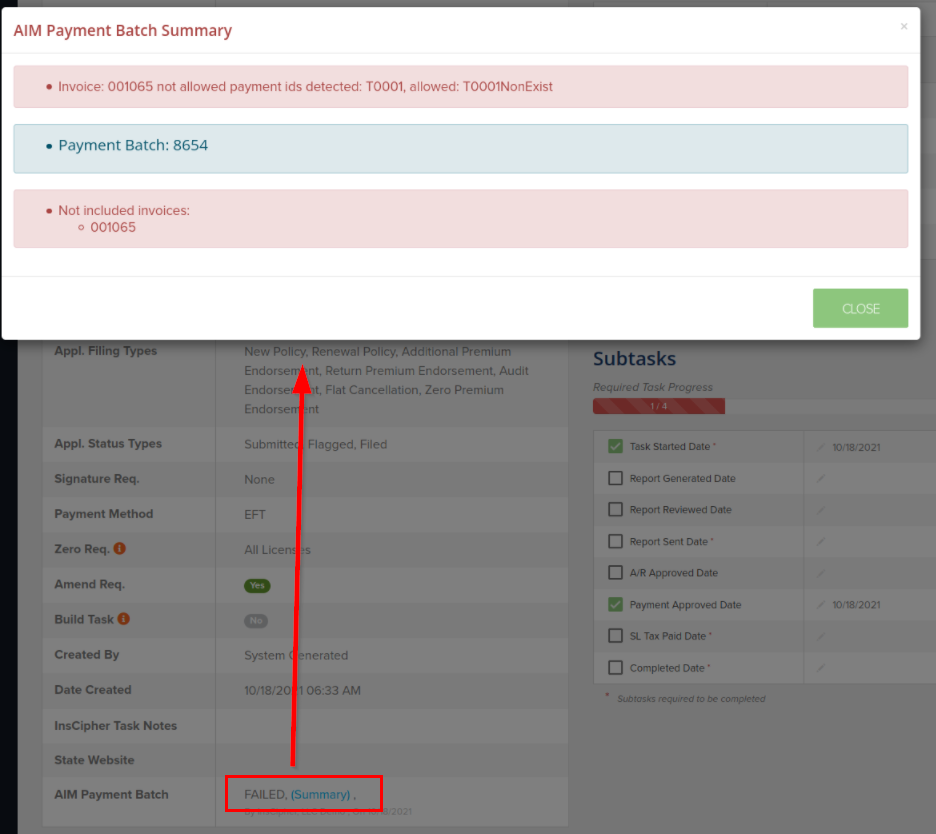
Note: A payment batch will be created for each PayeeID associated with the AIM® invoice transactions that are included in State Reporting Task from which the payment batch is initiated. The system uses the mapping provided during the initial setup of this feature and creates a batch in AIM with the correct PayeeID. Should there be AIM® invoice transactions that have the incorrect PayeeID on the invoice header (meaning that it was invoiced correctly), these will be flagged as such in the error messages, should this occur.
To access the error message, there will appear a "Summary" link next to the status in the same section. Here is an example:
CAUTION: Once this "Create Payment Batch in AIM" action is performed it cannot be undone or modified within the InsCipher portal. Modifications after the fact would need to be made directly in Vertafore AIM®.
IMPORTANT: Only transactions that have been imported into InsCipher using the AIM® integration tool and that have a valid "Invoice Number" can be exported back into AIM® via payment batches. This payment feature is not designed or meant to be used separately from the functionality of importing transactions. This system would show validation errors should a user attempt to create a payment batch that doesn't have a valid invoice number within AIM®.
What Is The Next Step?
Once this action is complete, you will need to go into AIM® and review the payment batch in the Tax Payables section in your AIM® Accounting Module and review the newly created batch. Should you need to edit the batch, you will need to do so in the Tax Payables section. Once the batch looks correct, you can post and continue the process of creating checks.
Change History
| DATE | DESCRIPTION OF CHANGE |
| 10/20/2021 | Formatting updates and sections for clarificatoin. Added section referring to new User mapping, new PayeeID setup requirement, and information about the new validation and error messages. |
| 9/8/2021 | Putting guide into Hubspot and publishing |