
This article is designed to help you learn how to use the Transaction CSV batch import tool in InsCipher.
Watch this 8 Min Tutorial
Table Of Contents
- Instructions on How to Use Batch Import Tool
- Troubleshooting Import Errors
- Description of Field Names on Sample CSV File
- What About Attaching Documents?
- Change History
How Do I Perform a Batch Import of Policy Transactions?
- Download a policy details report from your policy management software and convert this file to a .csv format. Many policy management systems allow for the exporting of policy details reports to a .csv file. However, some may not, and it may be required to convert the report from a .xls(x) format to a .csv format using a program like MS Excel. Regardless, in order to proceed to the next step, you will need to ensure that the file format is saved as a .csv.
Note: Previously, it was required that you use our required sample file in order to import policy transactions into the InsCipher portal. This is no longer required! You may still utilize this same file, should you already have a process built out for this. Download the sample file by clicking here. Descriptions of the headers can be found in the sample file.
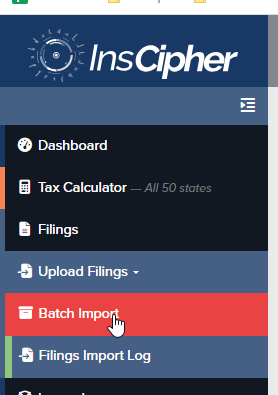
- After you have your file, on the left navigation bar, go to Upload Filings > Batch Import
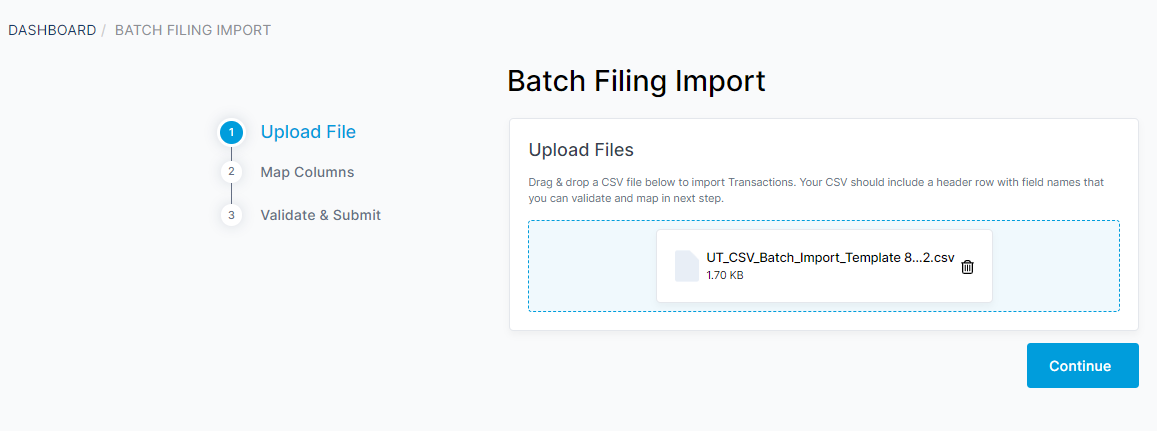
- On step 1 of the CSV import process, select your csv file. Then click "Continue" to proceed to Step 2 - Map Columns.
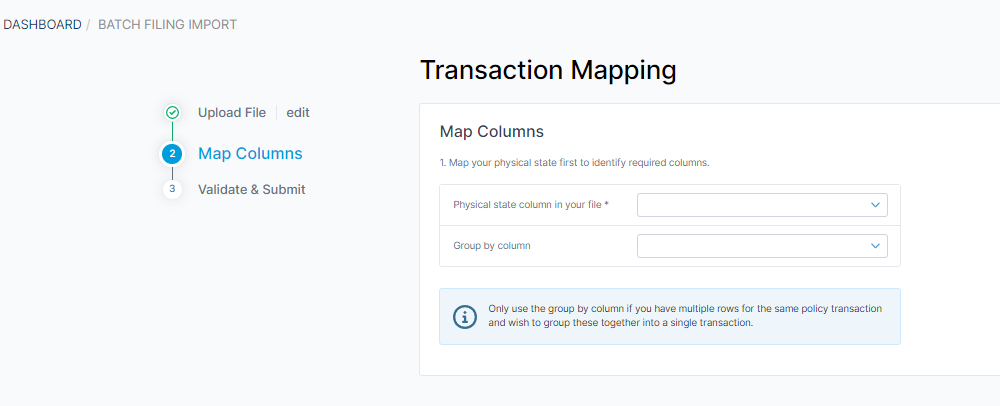
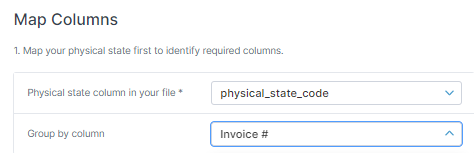
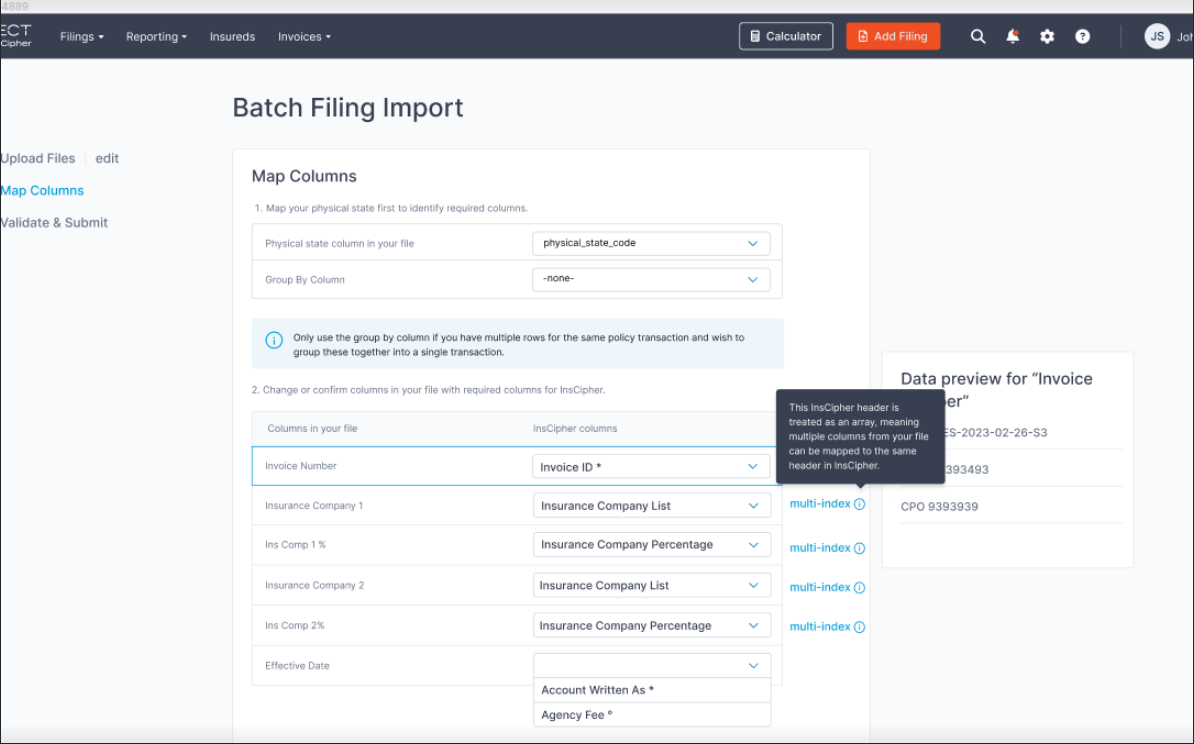
- In step 2 of the CSV import process, you will need to map the columns from your policy transaction report to the required headers in the InsCipher portal.
- Part 1 is to select the column that contains the physical/risk state of the policy transactions. If you use our import sample file, this will be called "physical_state_code". However, if you are using your own file, it may be called something different. Should you be using a file that has multiple rows for the same transaction, you can also use the option to "Group By Column". If your policy details for a single transaction is on one row, then leave these value blank.
- Part 2 will be to map all the remaining headers in your file.
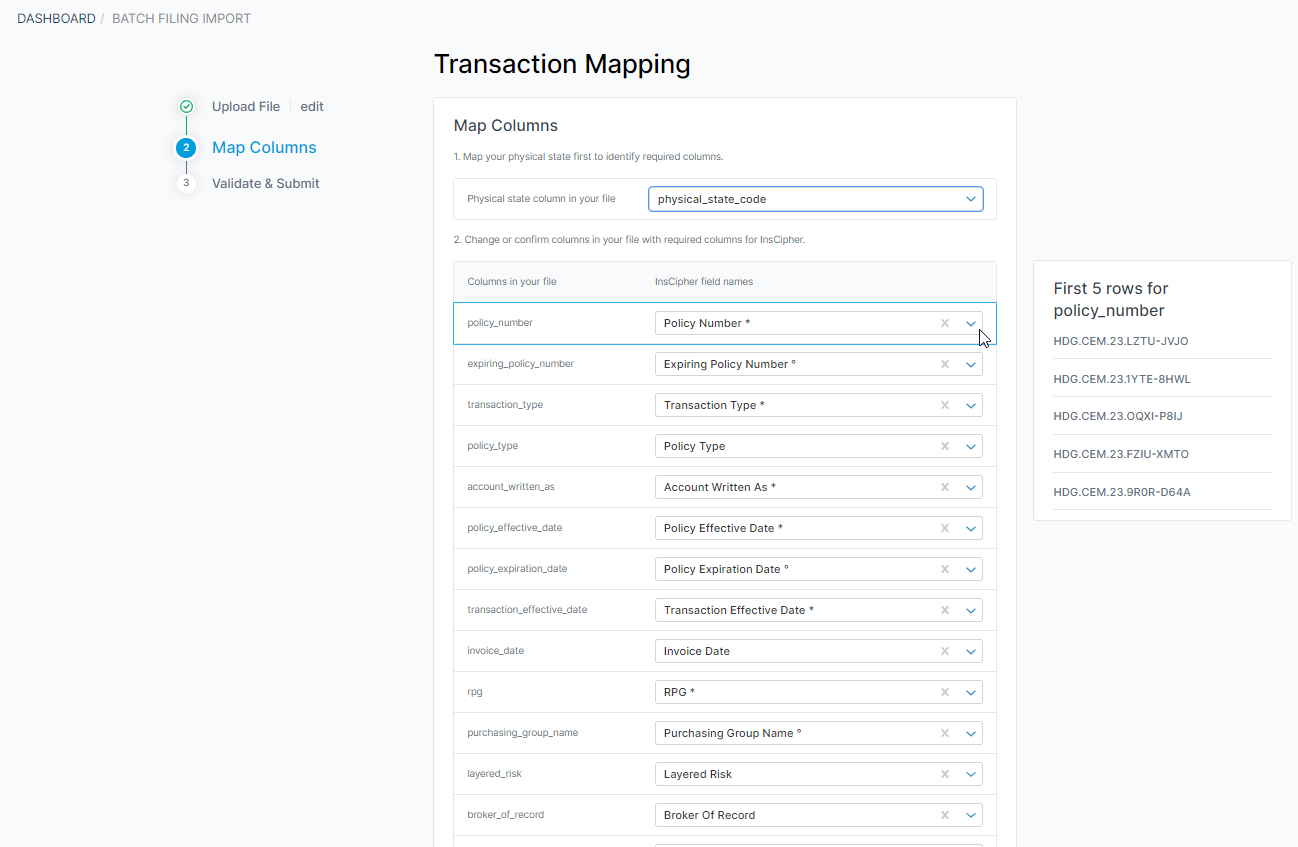
FYI! The nice thing about this feature is that we save the mappings you perform on this step so the next time you attempt to import transactions, the mapping will already be done for you!
- This new batch import process allows for CSV files with multiple rows or multiple columns.
- A summary is then provided at the bottom of the page. If you don't wish to map optional columns, then these values will not be imported.
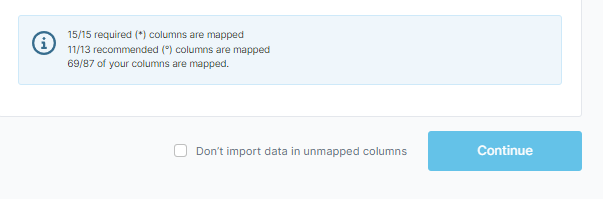
Important! You must map all required columns in order to proceed to the next step. However, to push transactions to a "Submitted" status, all recommended columns must be mapped as well. All other columns are optional. Click on the "Don't import data in unmapped columns" if you wish to bypass mapping all columns in your file.
- Part 1 is to select the column that contains the physical/risk state of the policy transactions. If you use our import sample file, this will be called "physical_state_code". However, if you are using your own file, it may be called something different. Should you be using a file that has multiple rows for the same transaction, you can also use the option to "Group By Column". If your policy details for a single transaction is on one row, then leave these value blank.
-
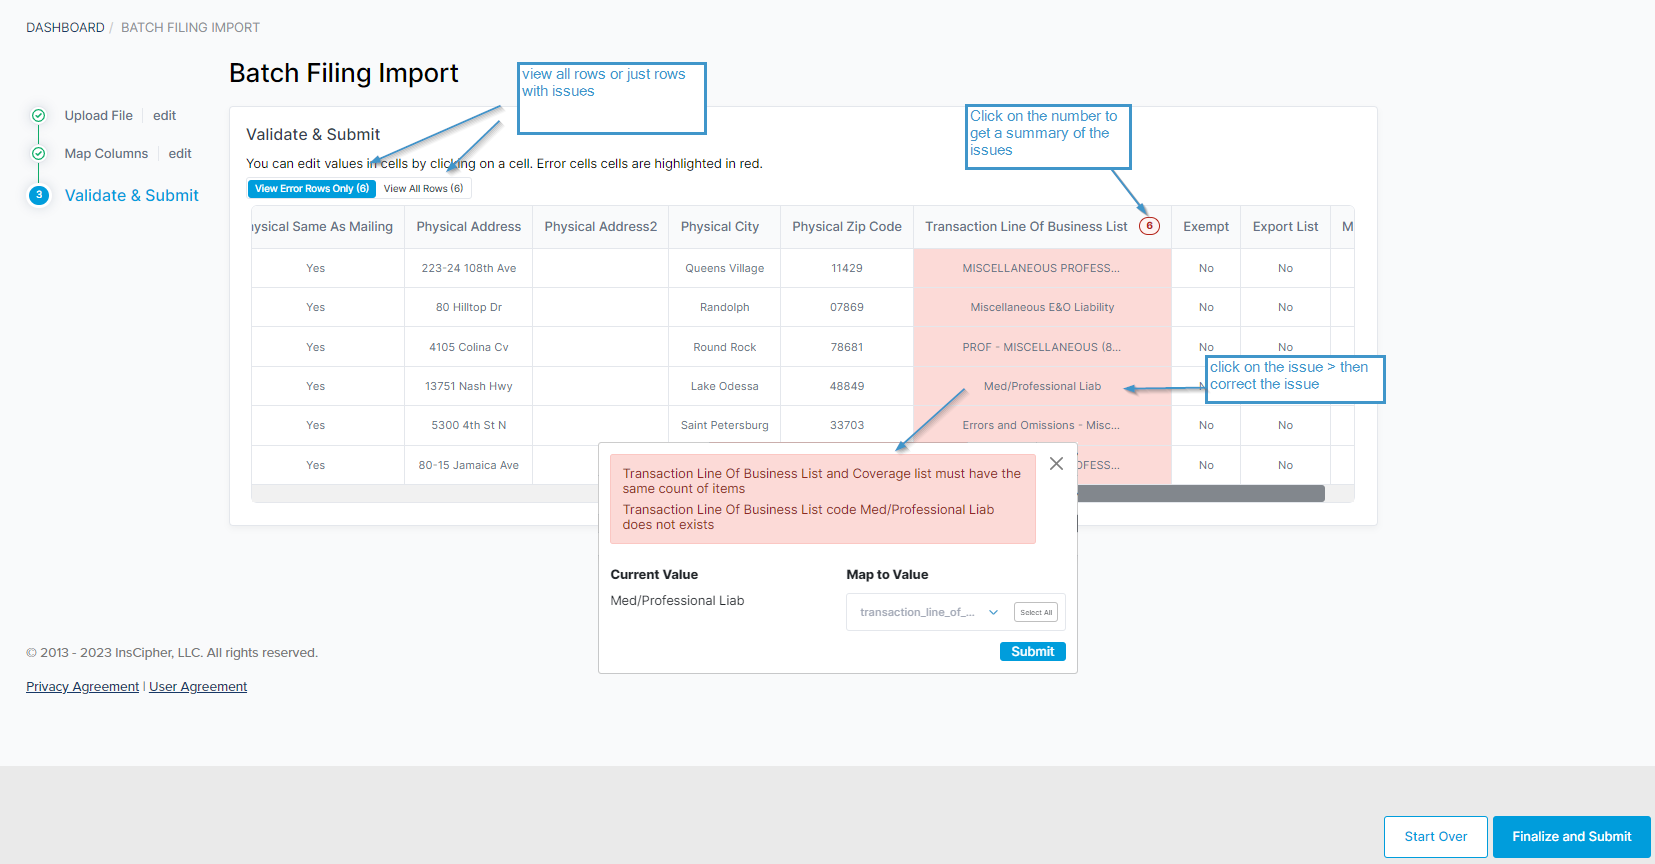
Tips!
- Click on the number on the column headers that contain issues to get a summary of the issues.
- Look for patterns. If errors apply to multiple rows, use the "Select all" option to apply to all affected rows when fixing a specific issue/field.
- Should there be many errors that make it difficult to proceed, consider fixing your underlying file and starting over.
- If you have questions about the header descriptions or accepted values, refer to the table below step 3 requires you to do a review and correct data on any rows that have errors. By default, only rows with errors will appear in this step, but you can view all shows as well with the toggle.
- If you are just importing a CSV, after you click "Continue" your file will be scheduled for import. Should you have any import errors, these will be displayed on the "Filings Import Log".
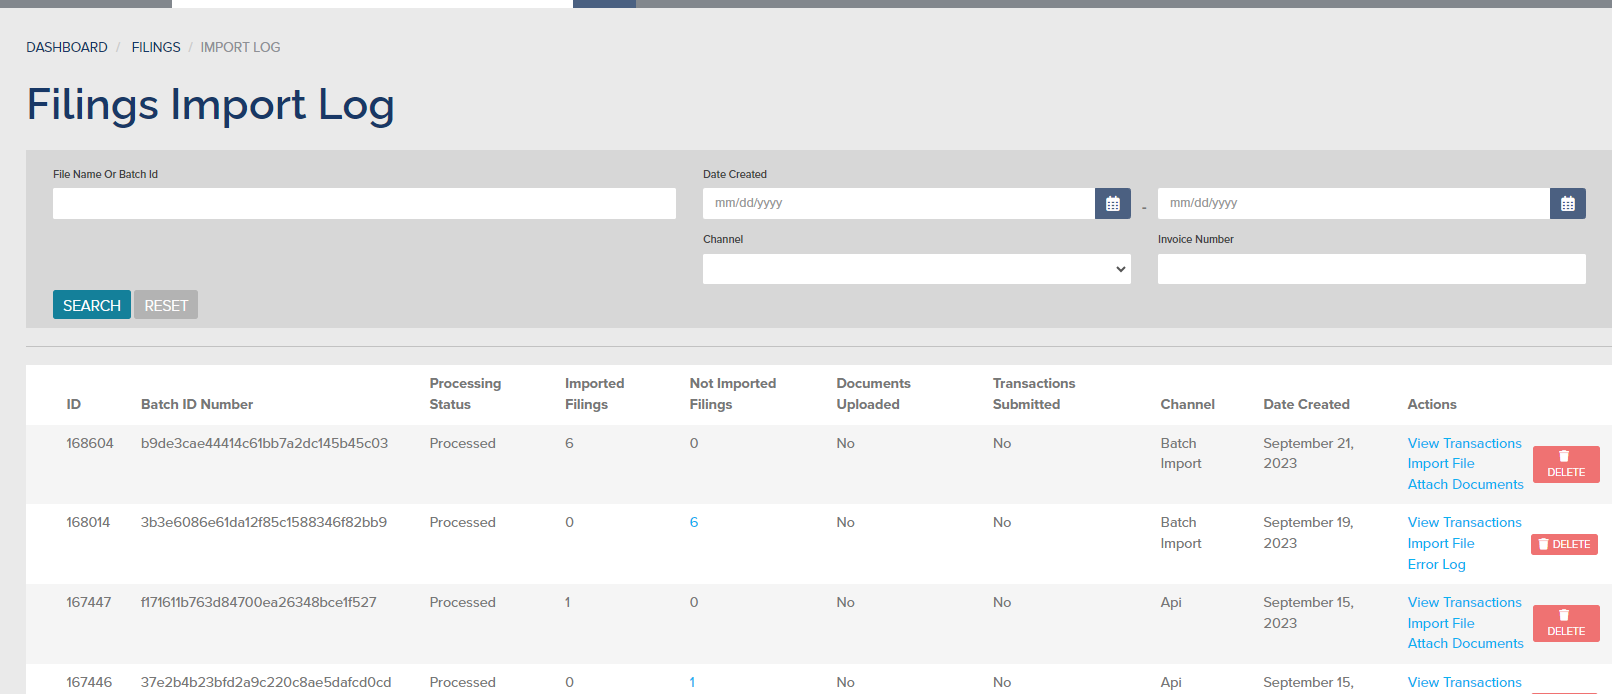


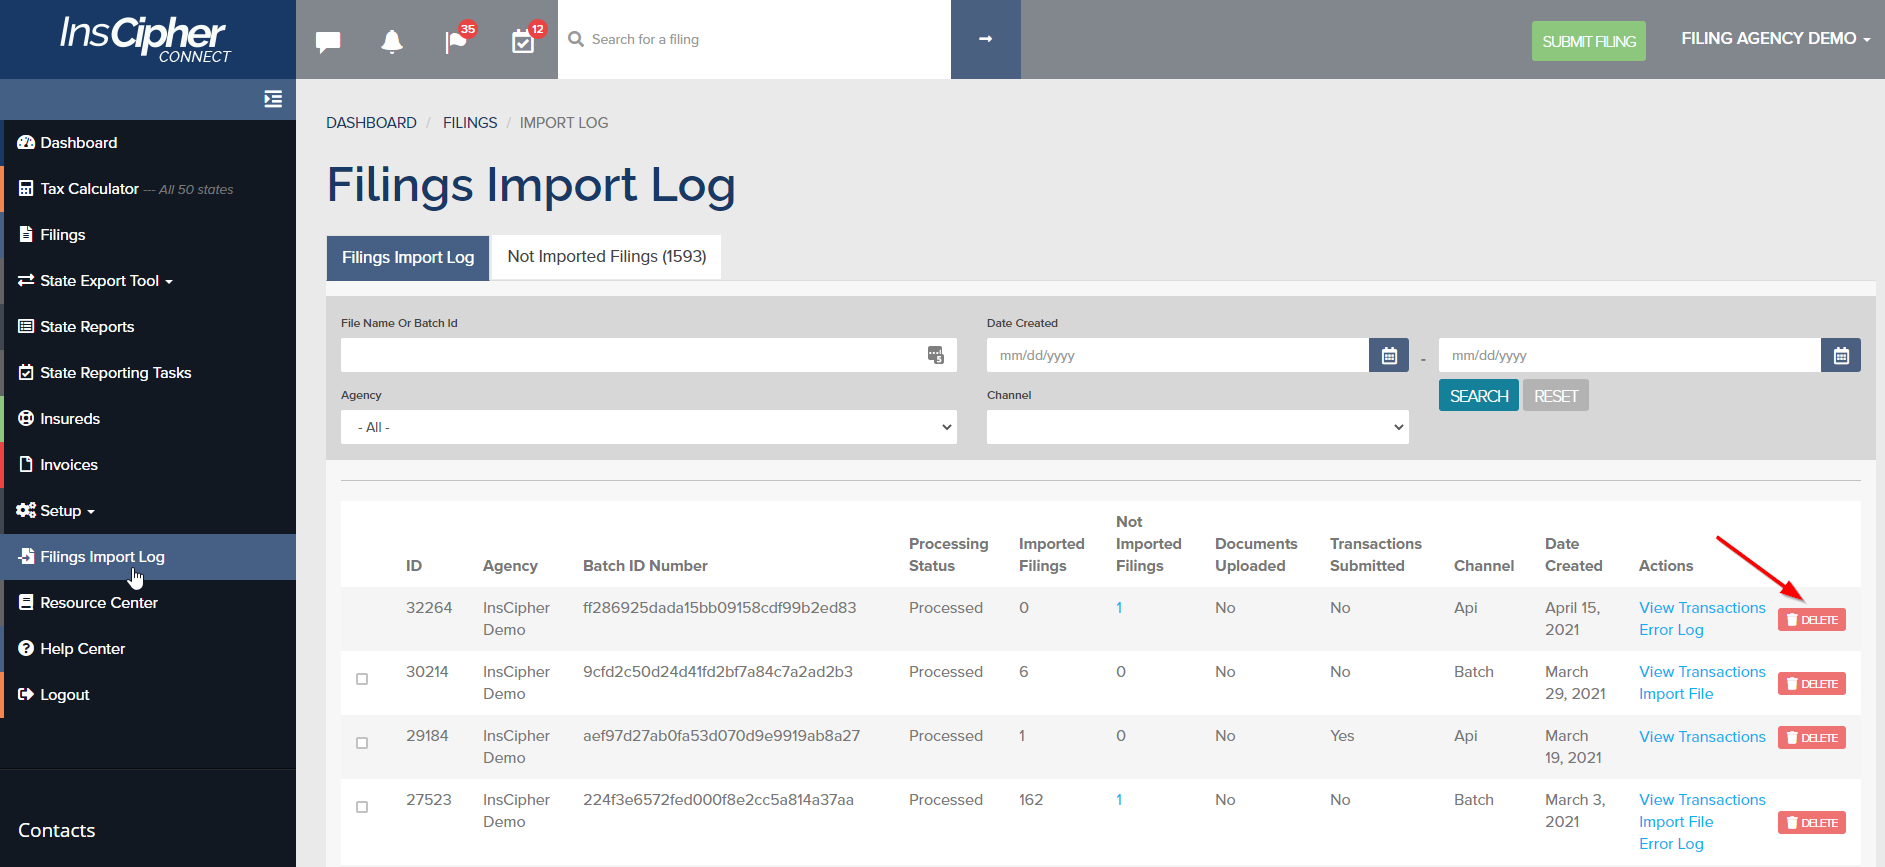
How Do I Correct a Batch if There are Errors?
- If there are many errors that came through on a batch, you can delete the entire batch by clicking the "Delete" button on the batch:
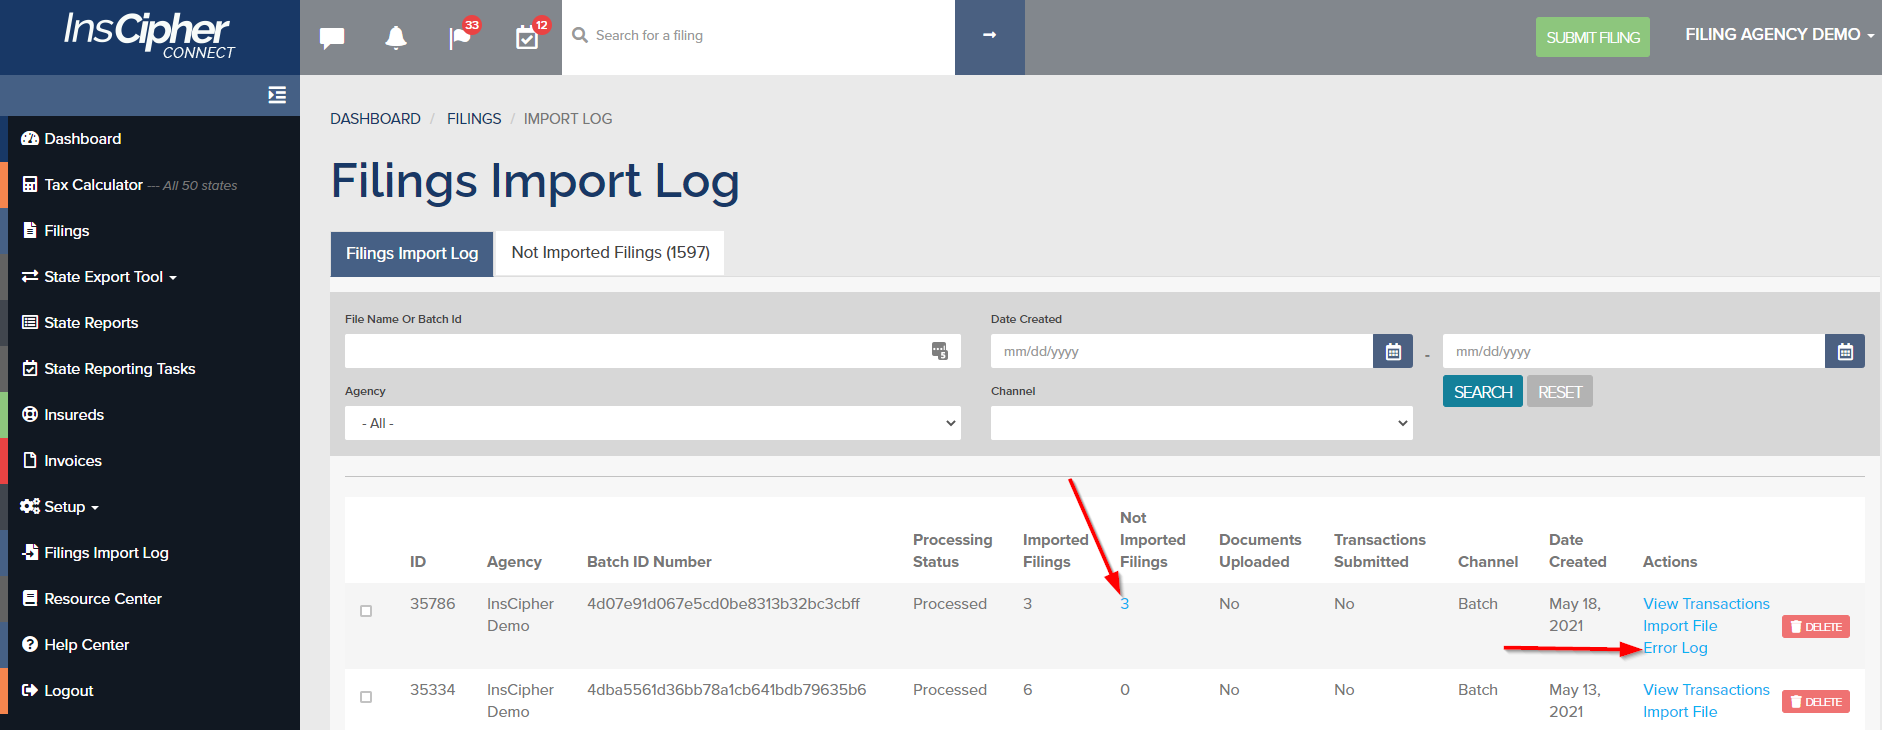
- You can also click under the "Not Imported Filings" or the "Error Log" to download a list of errors in the batch.
- When pulling up the error code list, you will see the reason for the error followed by the policy number that was trying to be uploaded.
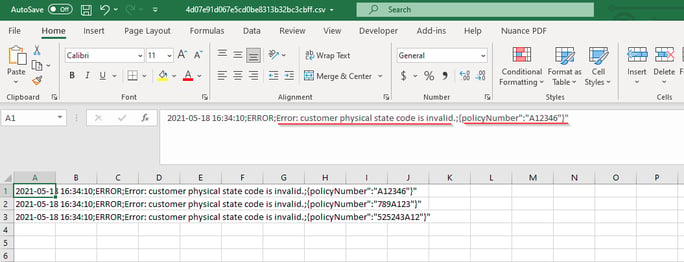
- You will then need to go into the batch and correct the error.
Description of Field Names and Requirements
To download the latest version of the CSV batch import sample template, click here.
Below, you will find a list of the different fields used, the description, and whether or not it is required for the CSV batch import to work. Take note, there are some optional fields that are required depending on the transaction that you are trying to import. There are additional codes that you can find at the bottom of this document such as insurer NAIC codes, description of risk, and lines of business.
|
Header Name on CSV Sample |
Description |
||||||||||||||||
|
policy_number |
Policy number. Non-unique field. |
||||||||||||||||
|
expiring_policy_number |
Expiring Policy Number Only Required for Renewal type policies. |
||||||||||||||||
|
transaction_type |
Transaction Types are as follows:
|
||||||||||||||||
|
account_written_as |
Use one of these two options: Brokerage = B Direct Client = DC Use "B" if you sell through a retail agent. Use "DC" if the policy is sold directly to the insured. If omitted, the default Agency Admin setting will be used |
||||||||||||||||
|
policy_effective_date |
Policy effective date |
||||||||||||||||
|
policy_expiration_date |
Policy expiration date |
||||||||||||||||
|
transaction_effective_date |
Transaction effective date For endorsements, this is the endorsement date. For New/Renewal policies, this is equal to the policy effective date. If omitted, today's date is used as transaction eff. date |
||||||||||||||||
|
invoice_date |
Required for Idaho. They call this "Broker Received Date". If omitted, the filing effective date will be used. |
||||||||||||||||
|
rpg |
Risk Purchasing Group? Yes = 1 |
||||||||||||||||
|
purchasing_group_name |
Required if RPG (rpg field) is set to Yes (or 1). If not included and RPG = Yes, then the transaction will still import but will show RPG error. |
||||||||||||||||
|
ecp |
Exempt Commercial Purchaser? No = 0 If omitted, 0 (zero) value will be imported. Unless you know what this is, set this value to 0. |
||||||||||||||||
|
multi_state |
Does the insured’s liability reside in multiple states? Multi state Yes = 1 InsCipher does not calculate Multi-state surplus lines tax breakdowns. With NIMA dissolving in 2016, InsCipher reports 100% of the premium to the home state of the insured and bases the tax percentages on that state. If omitted, the default is No (0). There are only a few states where InsCipher has enabled this field. |
||||||||||||||||
|
non_admitted_insurer_code_list |
This is the NAIC code associated with the insurer. Refer to the Insurance Company import list which can be downloaded here. For policies with multiple insurance companies, provide the NAIC insurer code list. Multiple values are separated by the pipe symbol “|”. For Lloyd's policies, use “AA-1122000”. ID requires multi-insurance company filings (if applicable), but UT does not. For Utah, select the carrier for which the majority of the risk resides. As this varies by state, we recommend importing all transactions with multiple insurance companies, where applicable and our system will translate this for you. Example: 26883|35351 Must also provide details in non_admitted_insurer_code_coverage “non_admitted_insurer_code_list": "26883|35351", |
||||||||||||||||
|
non_admitted_insurer_code_coverage |
Applicable percentage breakdown. For single insurance companies, list "100" here. For multiple insurance companies, list the breakout. This value would be the percentage breakdown in 100 based values (without the “%” sign). List these in the same order as the non_admitted_insurer_code_list. Multiple values are separated by the pipe symbol “|”. ID requires multi-insurance company filings (if applicable), but UT does not. For Utah, select the carrier for which the majority of the risk resides. As this varies by state, we recommend importing all transactions with multiple insurance companies, where applicable. If a state doesn't allow for multiple to be reported, then our system would select the carrier with the greatest percentage and report the amount with that carrier. Example: 60|40 |
||||||||||||||||
|
transaction_line_of_business_list
|
This is an InsCipher-specific import code which can be found here. For policies with a single LOB, enter the single import code. If there are multiple LOBs, then these would be added and separated by the pipe symbol “|”. Currently, ID and UT only require you to report the coverage for which the majority of the premium resides, so a breakout isn't necessary for these two states. |
||||||||||||||||
|
transaction_line_of_business_coverage |
The premium breakout (rounded to the nearest cent) without the dollar sign in the string. Single LOB - enter one value. Broken-out premiums should be separated by a pipe symbol “|” and should be in the same order as the transaction_line_of_buisness_list. Currently, ID and UT only require you to report the coverage for which the majority of the premium resides, so a breakout isn't necessary for these two states. |
||||||||||||||||
|
agency_fee |
Policy / Broker / Agency Fee or other revenue-generating fee charged and retained by the brokerage to cover admin costs. If omitted 0 (zero) amount will be imported |
||||||||||||||||
|
inspection_fee |
Inspection / Audit / Underwriting Fee or fee retained or required to be charged by the carrier. If omitted 0 (zero) amount will be imported |
||||||||||||||||
|
sl_tax |
Surplus Lines Tax (name may vary slightly by state). The requirement depends on the Agency account setting if tax import is optional. If left null, 0 (zero) amount will be imported. |
||||||||||||||||
|
stamping_fee |
Stamping Fee (name may vary slightly as FSLO fee in Florida). The requirement depends on the Agency account setting if tax import is optional. If applicable in the state and the amount is left null, then 0 (zero) amount will be imported. |
||||||||||||||||
|
total |
We recommend leaving this as null total amount = premium + all taxes + all policy fees. If omitted, the system will sum up and import the total automatically. |
||||||||||||||||
|
mailing_insured_name |
Full insured name as it appears in policy documents |
||||||||||||||||
|
mailing_address |
Insured mailing address |
||||||||||||||||
|
mailing_address2 |
Insured mailing address line 2 (if applicable) - ie. apartment #, suite, etc. |
||||||||||||||||
|
mailing_city |
Insured mailing city |
||||||||||||||||
|
mailing_zip_code |
Insured mailing zip code |
||||||||||||||||
|
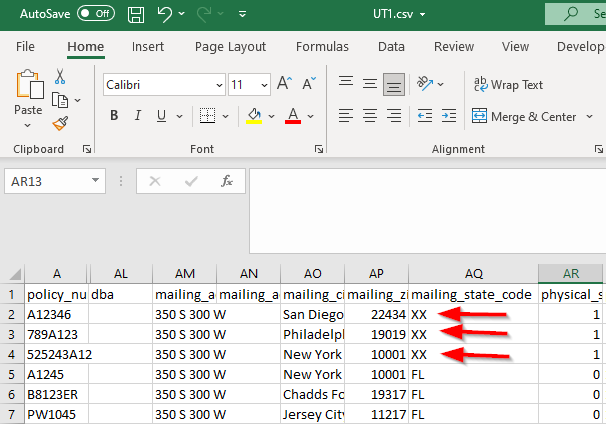
mailing_state_code |
Insured mailing state. 2 letter state code abbreviation. Example: "CA" = California or "FL" = Florida |
||||||||||||||||
|
physical_same_as_mailing |
If the Physical State is the same as the Mailing State, then set this value = 1 If the Physical State is NOT the same as the Mailing State, set this value = 0. IMPORTANT: If you make the physical state the same as the mailing state then you will need to make sure that both addresses are added with valid "States" codes or you will receive an import error. |
||||||||||||||||
|
physical_address |
Physical address Required if Physical State is NOT the same as Mailing State. |
||||||||||||||||
|
physical_address2 |
Physical address line 2 (if applicable) - ie. apartment #, suite, etc. |
||||||||||||||||
|
physical_city |
Physical City Required if Physical State is NOT the same as Mailing State. |
||||||||||||||||
|
physical_zip_code |
Physical zip code Required if Physical State is NOT the same as Mailing State. |
||||||||||||||||
|
physical_state_code |
Physical state. 2 letter state code Required if Physical State is NOT the same as Mailing State. |
||||||||||||||||
|
agent_notes |
Agent Notes Populates the Agent Notes section on the Filing Details page of a Filing Agent/Filing Agency Admin user. Include only if you want to add other information about the policy not captured in any of the other fields. |
||||||||||||||||
|
invoice_number |
This is the invoice number (or unique transaction ID) generated by your Agency Management System (AMS). This number allows users to trace imports to existing transactions within the management system as is a value we recommend importing. This number will be used to identify possible duplicate transactions. Identified duplicate transactions will be excluded from being imported. |
What About Attaching Documents?
We have a streamlined way of attaching documents. Please refer to this guide to learn more!
Change History
| DATE | DESCRIPTION OF CHANGE |
| 9/21/2023 | Brand new CSV importer workflow - documentation has been revamped based on the new functionality |